
In the rapidly evolving landscape of artificial intelligence and machine learning, the ability to swiftly prototype and test ideas is a crucial asset for researchers, developers, and data scientists alike.
Hugging Face, a leading provider of cutting-edge natural language processing tools and models, has become an essential platform for accelerating innovation in AI development. With an extensive library of pre-trained models and a user-friendly interface, Hugging Face empowers users to explore complex concepts and validate hypotheses with minimal setup time.
In this hands-on tutorial, we’ll guide you through the process of using Hugging Face’s tools and resources to quickly bring your concepts to life.
Prerequisites
You should have an account in Hugging Face. If not, please create one.
Step-by-Step Tutorial
In this tutorial we will be creating a chatbot using Hugging Face Spaces and connecting it a previously fined tuned model hosted on the Hugging Face Hub. This chatbot should be able to respond questions about Taylor Swift.
Step 1: Upload the Model to Hugging Face Hub
In this tutorial, we have learned how to fine tune a model, so it can respond questions about Taylor Swift. Lets use that same fine-tuned model for this tutorial.
Install Hugging Face required libraries: You can install them using pip:
pip install transformers huggingface_hub
pip install transformers[torch]
Log In to Hugging Face CLI: From the terminal, authenticate using the Hugging Face CLI to push models to the Hub:
huggingface-cli login
Follow the prompts to enter your Hugging Face credentials.
Prepare Your Mode and push it to the hub: Load your model and tokenizer using the transformers library. The push_to_hub method allows you to upload your model in a streamlined manner. Here’s how you can do it:
from transformers import AutoModelForCausalLM, AutoTokenizer

# Load your model and tokenizer
model = AutoModelForCausalLM.from_pretrained("your-local-model-path") # Update the path
tokenizer = AutoTokenizer.from_pretrained("your-local-model-path") # Update the path

# Push the model to the hub
model.push_to_hub("your-model-name", use_temp_dir=False) # Update the model name. Ex: "RicardoGarces/faq-taylor-swift"
tokenizer.push_to_hub("your-model-name", use_temp_dir=False) # Update the model name. Ex: "RicardoGarces/faq-taylor-swift"
Once the script has been fully executed, you should see the newly created model associated to your account, in Hugging Face:

In the case that you don’t have the fine-tuned model in your computer, ignore the previous steps and simply use this model (already available in Hugging Face Hub).
Find the source code for this script here.
Step 2: Set Up a Hugging Face Space
Create a Space: Open the Hugging Face Spaces website and create a new Space. You can choose several options to use as your interface. We will be using Gradio, since it is often simpler for creating interactive demos:
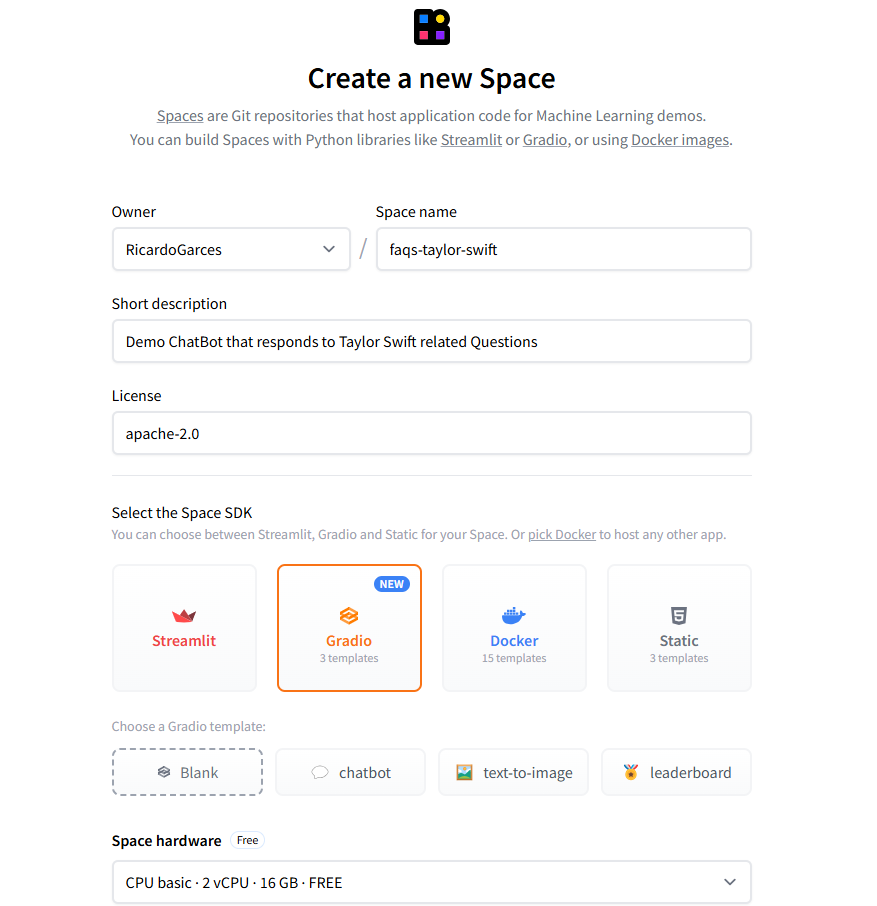
Proceed with the Space creation, using the default options listed.
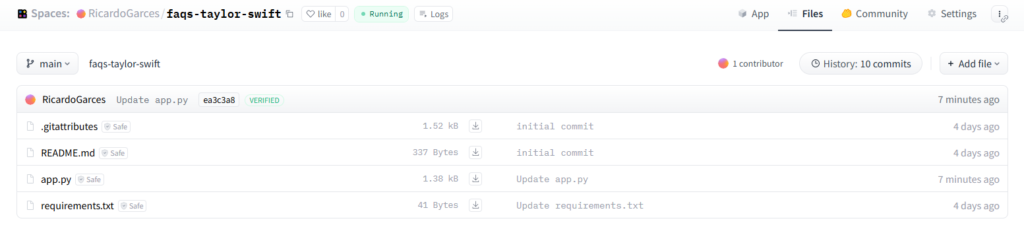
Create a Gradio Interface: In the new Space created, navigate to “Files”.

Start by creating a app.py script to define your Gradio interface, using the button “Add File”. Next you can find a basic example of the content of this file (don’t forget to change the model name to the your own model’s name).
import gradio as gr
from transformers import pipeline

# Initialize the text-to-text generation pipeline
pipe = pipeline("text2text-generation", model="your-model-name") # Update the model name. Ex: "RicardoGarces/faq-taylor-swift"

# Define a function to use the model
def generate_response(input_text):
    # Generate output using the model pipeline
    result = pipe(input_text)
    # Extract the generated text from the result
    return result[0]['generated_text']

# Create a Gradio Blocks interface
with gr.Blocks(theme=gr.themes.Soft()) as demo:
    gr.Markdown("# FAQ Taylor Swift Generator")
    gr.Markdown("Ask questions about Taylor Swift and get informative responses.")

    with gr.Row():

        input_text = gr.Textbox(
            label="Question",
            lines=2,
            placeholder="Enter your question here..."
        )

    with gr.Row():
        # Button to trigger the generation
        submit_btn = gr.Button("Generate Response")

    with gr.Row():
        output_text = gr.Textbox(label="Generated Response")

    with gr.Row():
        # Add a new row for the note
        gr.Markdown("**Note:** This space is only used for demonstrational purposes and therefore the information shared may not be accurate.")


    # Define interaction between components
    submit_btn.click(fn=generate_response, inputs=input_text, outputs=output_text)

# Launch the interface
demo.launch()
Also create a requirements.txt file that should include all required dependencies listed. Next you can find a basic example of the content of this file:
gradio
transformers
huggingface_hub
torch
Commit your files to the Space repository. The Hugging Face Spaces will automatically build and deploy your application.
Alternatively, you could have use Git to create and commit the app.py and requirements.txt files.
Interact with Your Chatbot: Once the space is running, you can interact with your chatbot. You can even share the space with others or embed it into your website if needed (like I did).
Find the source code for the app here.
Conclusion
By leveraging the tools and resources provided by Hugging Face, you can significantly reduce the time and effort required to develop and test your machine learning ideas. This hands-on tutorial has demonstrated how easy it is to get started with Hugging Face, from setting up your environment to deploying interactive applications.
As you delve deeper into Hugging Face, you’ll discover its remarkable ability to facilitate the creation of proof-of-concepts (PoCs) and significantly accelerate the development process. The platform empowers you to innovate within natural language processing (NLP) and beyond, transforming ideas into actionable projects swiftly.